Renovation and tenant improvement projects often trigger specific ADA compliance requirements and many teams overlook them until inspections fail. Understanding what triggers inspections, when they are required, and how to coordinate them helps prevent costly rework, delays, and legal risks.
This guide breaks down inspection triggers, scheduling, documentation, and the roles involved in ADA compliance.
What Triggers ADA Inspection Requirements During Renovations?
ADA inspections are required when renovations affect primary function areas, meaning spaces where the main activities occur.
Primary Function Areas (Inspection Required)
- Dining areas in restaurants
- Customer-service or retail areas
- General office workspace
- Classrooms
- Exam rooms or patient-care spaces
Not Considered Primary Function Areas
- Mechanical rooms
- Storage rooms
- Staff lounges
- Corridors
When renovations change the usability of primary areas, you must also upgrade the path of travel, including:
- Entrances
- Restrooms
- Drinking fountains
- Telephones
- Interior accessible routes
Examples of Alterations That Trigger ADA Inspections
- Remodeling checkout or merchandise display areas
- Replacing flooring in customer-service zones
- Redesigning production lines or office layouts
- Installing new IT equipment that affects space layout
- HVAC improvements that change ceiling height or clearances
Even minor changes can trigger ADA upgrades if they impact accessibility.
How the 20% Rule Applies to Tenant Improvements
The 20% disproportionality rule determines how much you must spend on accessibility upgrades when renovating a primary function area.
How It Works
- Calculate the total cost of renovating the primary function area.
- Allocate up to 20% of that amount to improve the path of travel.
- If path-of-travel improvements exceed the 20% limit, additional work becomes optional.
Costs Included
- Materials
- Labour
- Contractor fees directly tied to the altered area
Costs Excluded
- Basic maintenance
- Roof repairs
- Painting and wallpapering
- Alterations in non-primary areas
Three-Year Aggregation Rule
If multiple renovations occur on the same path of travel within three years, combine all costs to determine the 20% threshold. This prevents skipping upgrades by splitting work into small phases.
Priority Order for Upgrades
If the budget is limited, improve in this order:
- Accessible entrance
- Accessible route to altered area
- Restrooms
- Telephones
- Drinking fountains
When Should ADA Inspections Take Place?
ADA inspections should occur at three key stages.
1. Pre-Construction Inspection
Best done before finalising architectural drawings.
This identifies:
- Existing barriers
- Safe harbour elements
- Required path-of-travel upgrades
- Realistic compliance costs
2. During-Construction Checkpoints
Schedule inspections when work becomes concealed or hard to fix later, such as:
- Before concrete pours (ramps, slopes, foundations)
- Before paving accessible routes
- Before drywall (door frames, clearances)
- Before tiling bathrooms (grab bar backing)
3. Final Inspections
Conducted after construction but before occupancy, including:
- Door force testing
- Turning diameter measurements
- Ramp slope verification
- Clear floor space checks
Take photos, record measurements, and prepare a compliance report for building officials.
Areas That Must Be Inspected When Altering Primary Function Spaces
Key elements include:
Accessible Routes
- 36-inch minimum clear width
- 32-inch door clearance when door opens 90 degrees
- No protruding objects below 80 inches height
Entrances
- 60-inch deep level landings
- Threshold max: ½ inch, beveled both sides
- Interior door force ≤ 5 lbs
Restrooms
- 60-inch turning radius
- Proper grab bar heights (33–36 inches)
- Correct compartment dimensions
- Adequate knee clearance under lavatories
Parking
- 96-inch accessible stalls
- 60-inch access aisles
- 98-inch vertical clearance for van spaces
Who Should Coordinate ADA Inspections?
ADA compliance requires multiple professionals working together.
1. Accessibility Consultant or CASp (Preferred Lead)
- Reviews plans
- Performs all inspections
- Provides official compliance documentation
2. Architects
- Responsible for designing compliant plans
- Coordinates with inspectors
- Ensures proper product specifications
3. General Contractors
- Manage schedules and construction timelines
- Follow accessibility requirements under guidance
4. Building Department Inspectors
- Verify code compliance but are not ADA specialists
- Should not be the only inspection relied on
How to Document ADA Compliance
Proper documentation reduces legal risks and simplifies future inspections.
Documentation You Should Maintain
- Cost breakdowns (primary function vs. path of travel)
- Photographs of existing and final conditions
- Door-force gauge results
- Ramp and route slope measurements
- Grab bar measurements
- As-built drawings with accessibility annotations
- CASp inspection certificates
- Correspondence with building officials
Keep everything archived for future renovations or complaints.
Common ADA Violations in Tenant Improvements
Typical violations include:
1. Door Force & Hardware
- Door force over 5 lbs
- Binding hinges
- Incorrect hardware or mounting height
2. Grab Bar Issues
- Incorrect height
- Wrong length
- Missing reinforcement
3. Insufficient Turning Space
- Less than 60-inch turning radius
- Overlap with fixture clearances
4. Counter & Lavatory Non-Compliance
- Counter too high
- Blocked knee space
- Exposed pipes without protection
5. Ramp & Route Slopes
- Ramps steeper than 1:12
- Cross slopes exceeding 1:48
Technical Infeasibility and How It Affects ADA Requirements
Sometimes full compliance is not physically possible due to structural conditions.
Examples of Technical Infeasibility
- Removing load-bearing structural walls
- Altering protected historic elements
- Modifying elevator shafts or major structural columns
Required Documentation
- Engineering analysis
- Drawings showing constraints
- Explanation of alternative solutions considered
Even when infeasible, provide maximum feasible access, such as:
- Alternative entrance with signage
- Operational accommodations
- Equivalent facilitation routes
Permit Coordination and ADA Inspection Requirements
ADA compliance ties directly into the construction permitting process.
During Permit Application
Submit:
- Accessibility statements
- Drawings showing ADA features
- Path-of-travel compliance analysis
During Plan Review
Expect:
- 2–6 week review period
- Possible fire code coordination
- Additional accessibility checks for complex TI projects
During Construction
Align inspections with:
- Framing inspections
- Plumbing/mechanical rough-in
- Fire/life safety inspections
Only schedule final building inspections after your accessibility consultant confirms compliance.
Creating an ADA Inspection Checklist
A customised checklist keeps your project organised and compliant.
Checklist Must Include:
- Parking and exterior routes
- Entrances and thresholds
- Interior accessible paths
- Restrooms
- Service counters
- Primary function areas
How to Organize It
- Site work & parking
- Building exterior & entrance
- Interior accessible routes
- Room-by-room requirements
- Measurements & notes
Prioritize items that fall under the 20% rule.
Consequences of Failing ADA Inspections
Failing ADA inspections can cause serious project and financial issues.
1. Project Delays
- Permit rejection
- Failed municipal inspections
- Delayed occupancy and revenue
2. High Correction Costs
- Rework after finishes are installed
- Potential demolition of completed work
- 150–300% higher costs than installing correctly
3. Legal Liability
- Lawsuits
- Attorney fees
- Settlements (common in California)
4. Insurance & Lease Impacts
- Higher premiums
- Limited coverage
- Disputes over responsibility for violations
Conclusion
Coordinating ADA inspections during renovations requires careful planning, accurate documentation, and expert oversight. By scheduling inspections at key construction stages and working with qualified accessibility professionals, you can prevent violations, reduce correction costs, and keep projects on schedule.
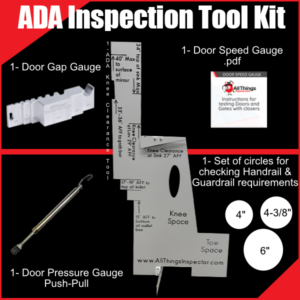
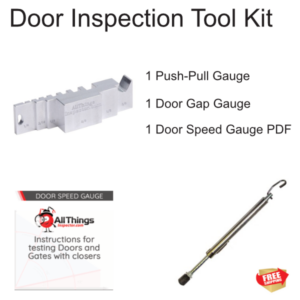
To ensure accurate compliance checks, professionals rely on tools like door pressure gauges, knee-clearance templates, and gap gauges.
These tools help verify ADA requirements quickly and confidently.
FAQs
1. When do I need an ADA inspection for renovation work?
You need an ADA inspection whenever your renovation affects a primary function area or changes accessibility to spaces used by customers, employees, or the public.
2. What happens if my renovation budget cannot cover full ADA upgrades?
The 20% rule applies. You must spend up to 20% of the renovation cost on path-of-travel upgrades, prioritised in a specific order. Anything beyond that becomes optional.
3. Is technical infeasibility an excuse to avoid ADA compliance?
Not fully. You must prove infeasibility with engineering documentation and then provide maximum feasible access or alternative solutions.
4. Who is responsible for ADA compliance, tenant, contractor, or owner?
Responsibility depends on the lease agreement, but owners, architects, and contractors all share compliance obligations. Consult the lease and verify responsibilities early.
5. Can a municipal building inspector fail my project for ADA issues?
Yes, but municipal inspections are not enough. Many jurisdictions lack ADA specialists, so you still need a private accessibility consultant or CASp to ensure full compliance.